EAC CD grabbing howto
Last modified: January 24th, 2008
Last update: 2008. January 22. 02:47
This howto is based on OiNK (R.I.P.) EAC ripping guide. You’ll need the following apps:
CD grabber: EAC
FLAC compressor: FLAC
MP3 compressor: razorLAME
You don’t have to install them, just extract them to separate folders. Put flac.exe to a dir what is in the PATH, for ex. c:\windows.
Why you should use EAC?
The original audio CD specification lacks a few features because they wanted more space to be available on the discs for audio. So for example there is only simplified error protection in comparison to data CDs, and there’s no accurate block addressing, so when the drive seeks, it may start reading in the middle of a block, which causes a clicking noise. That’s jitter.
Other grabbers only do jitter correction and don’t detect and log occasional distortions caused by the scratches on the disc. EAC sets the CD-ROM’s built-in error correction mechanism to the lowest level and instead of using that, it reads erroneous blocks again and again, and tries not to return with interpolated audio samples generated by the built-in error correction. So if we grab a non-scratched CD with EAC, we can be sure that we will have the exact same audio that the mastering engineer had in his/her studio.
EAC installation
We’ll set EAC to save audio in FLAC format. If you want to convert FLACs to MP3s, there’s a description at the end of this howto.
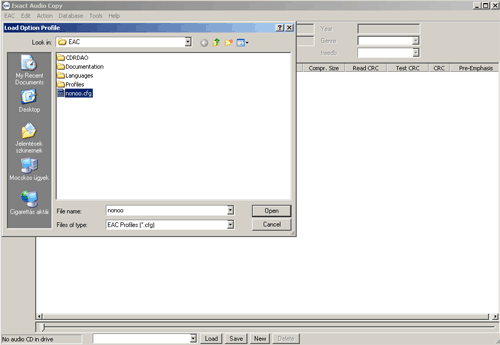
After you decompressed eac.zip and started EAC, first press SHIFT+F1 and load nonoo.cfg:
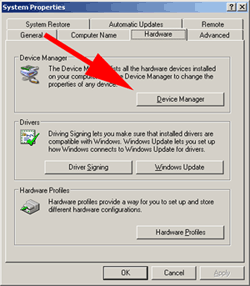
Then go to start menu->settings->control panel, and double-click on system icon. Choose hardware tab here and click on the device manager button:
Look for your CD drive under DVD/CD-ROM drives, or optical drives. The arrow on the picture points at my CD drive.
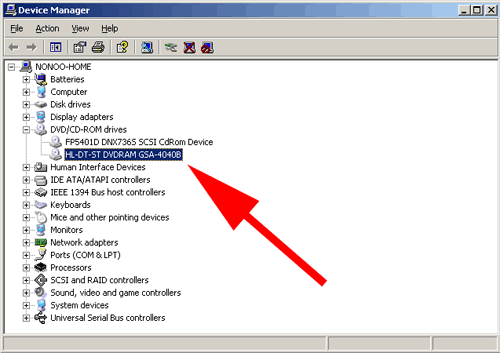
Note down the type of the CD drive (for ex. mine is GSA-4040b), then look for the “correction offset” value for your drive on this list.

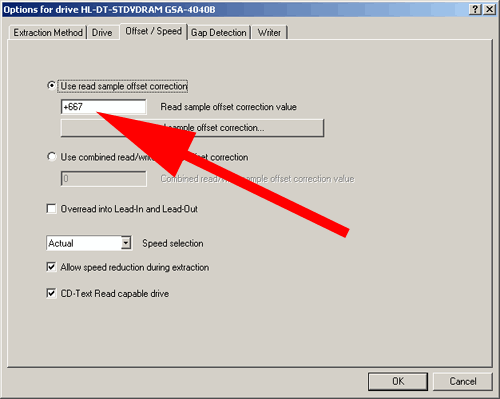
You can see that my CD drive has the correction offset of +667, your drive’s may be different, if it’s not the same type. Ignore that if your drive is for ex. GSA-4040b and there is only GSA-4040 on the list.
If you got the value, you can close this window and go back to EAC. Press F10 and set the previously found offset value at the editbox marked by the arrow (Offset / Speed tab).
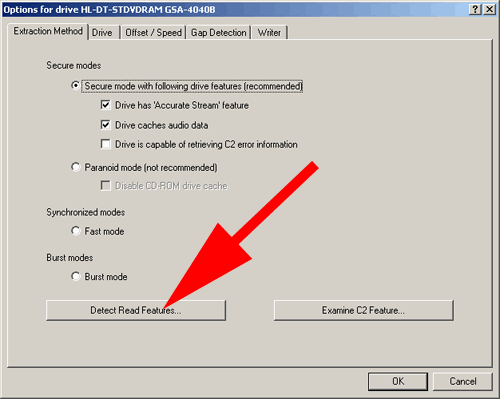
If you’re done with this, put your disc into the drive and go to Extraction method tab, then click on the Detect Read Features button:
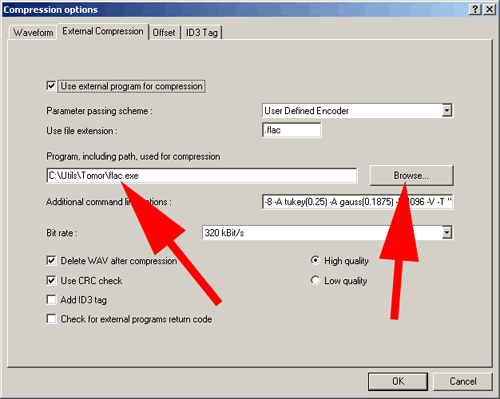
If you’re done, close the window by clicking OK, then press F11 and set the path to your FLAC compressor, either by clicking on the Browse button or giving the exact path:
Close the window by clicking OK, and now you’re done with the setup. You can save these settings to a separate config file if you want (EAC menu, Profiles, Save Profile…).
Using EAC
Put your CD into the drive, then push F9 and check that Error recovery quality is set to High on the Extraction tab:
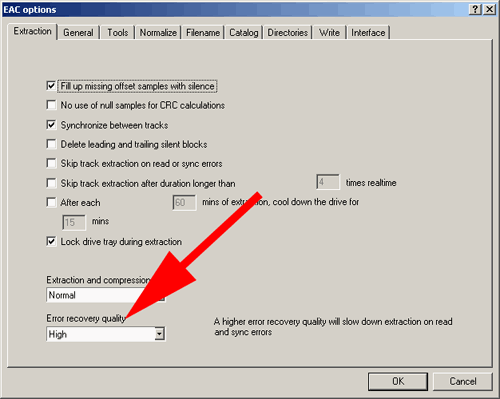
If not, set it to High for now, then close the window by clicking OK.
Then you have 2 choices:
- You copy the whole image with a CUE file: you should always choose this. It’s simpler to split up a big file (with this program, it will ask for an email upon downloading, but you don’t have to enter anything) than to join separate smaller FLAC files.
- Save the tracks to separate FLAC files: only choose this if there are no fades between tracks, otherwise use the former method.
If you want to copy the whole image, choose Action->Copy Image & Create CUE Sheet->Compressed… from the menu:
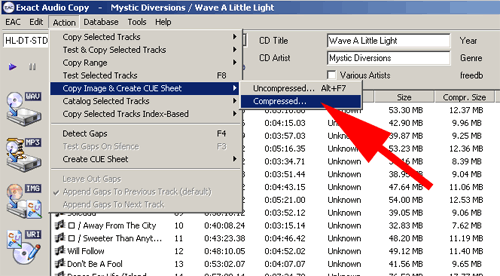
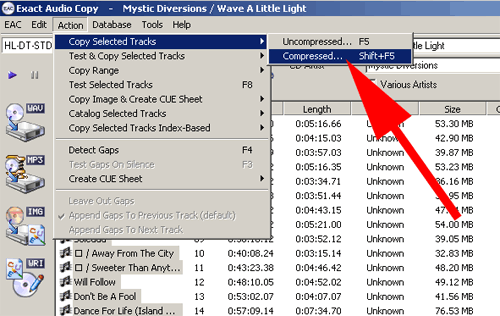
If you want separate FLAC files for every track, select all tracks and then choose Action->Copy Selected Tracks->Compressed… from the menu:
At the beginning of the process, EAC will detect gaps between tracks, then the actual transfer begins:
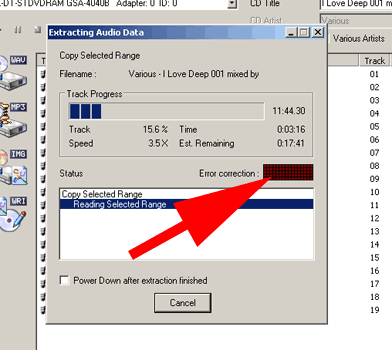
If there’s a scratch or other error on the CD, the bar marked on the image starts to fill up with red squares (as many red squares will light up as many times EAC has to reread a section). Generally there’s no problem until all of the red squares light up. That means EAC was unable to correct the error and probably the saved audio will be erroneous at the given position (this pos will be marked in the log).
If your dark square matrix is smaller than the one on the picture, your Error correction level is not set to High. You should always set it to High (more on this in the Troubleshooting section).
Always check the .log file after copying and listen to the audio at the marked positions, to be sure that there’s no error in the sound!
Final results
The final result is a .cue, one (or more, if you saved the CD into separate FLAC files) .flac, and a .log file. Those are all required, so don’t delete anything.
If you saved the whole CD in one FLAC file and playback won’t start when you click on the .cue file, open the .cue with a text editor (notepad or F4 in Total Commander), then change the line
FILE “something.wav” WAVE
to
FILE “something.flac” FLAC
If it doesn’t play after all, it could be that your player doesn’t support .cue or .flac files. Use this.
Troubleshooting
The copying of a scratchy CD can be as long as 5 or 6 hours, so be patient. Always wait till the end of the process! If it won’t finish after 6 hours, stop it, press F9 and set Error recovery quality from High to Medium, or from Medium to Low, then start the process again.
Don’t forget to set Error recovery quality back to High before you start to grab another CD! Anyway you should polish the CD either at a CD polishing shop or at a car cleaner or glazer.
If the output of the process is not one (or more, if you saved the CD into separate FLAC files) .flac file(s), one .cue and one .log file – there are .wav files instead of .flacs, then you probably set wrong path for the FLAC compressor. You can find how to set the correct path for the FLAC compressor above. If this happens, you don’t have to restart grabbing, just compress the .wav files one by one using the FLAC compressor manually. Enter this into the command line (for ex. to the editbox at the bottom of Total Commander):
flac.exe -8 -A tukey(0.25) -A gauss(0.1875) -b 4096 -V –sector-align “something.wav”
Replace something.wav with the name of the actual .wav file. If it won’t work, try:
flac.exe -8 “something.wav”
If you copied the CD into separate .flac files, you have to compress every track one by one.
If this still doesn’t work, then there is no flac.exe in the PATH. Copy flac.exe to c:\windows, or to the dir where your .wav files are.
Converting audio to MP3 (FLAC to MP3)
We’re using LAME compressor with the razorLAME frontend for MP3 conversion, making 320kbps VBR (V0) MP3s.
You should always use FLAC, but if you have to convert them to MP3s, first you have to decompress FLACs to WAVs. Enter this to the command line:
flac.exe -d “something.flac”
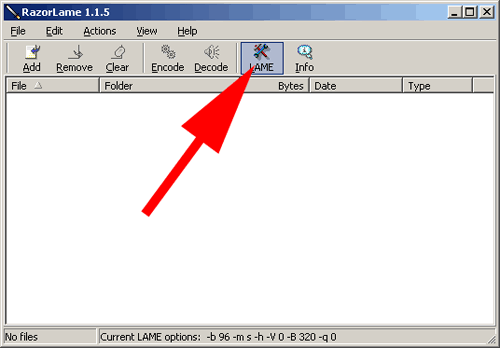
You have to run this command on all of the FLAC files one by one. Then start Razorlame, click on the LAME button on the toolbar:
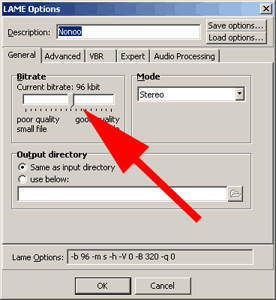
Check that Current bitrate is set to 96kbps on the General tab:
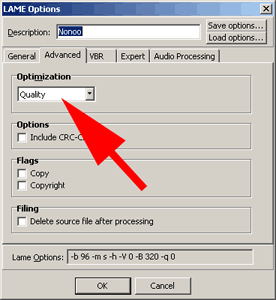
Check that Optimization is set to Quality on the Advanced tab:
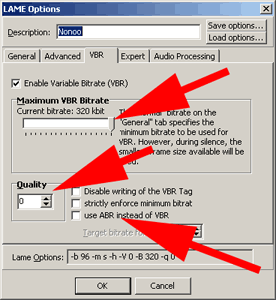
Check that Maximum VBR Bitrate is set to 320kbps, Quality is set to 0 and use ABR instead of VBR is OFF on the VBR tab:
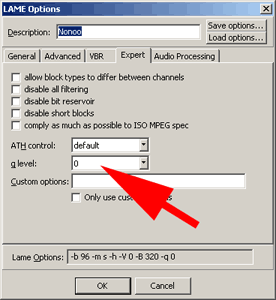
Check that q is set to 0 on the Expert tab:
After this you can close the settings window by clicking OK. Drag & drop the .wav files you want to compress to the Razorlame window, then click on the Encode button on the toolbar.
You can delete the .wav files after compressing. Copy the mp3 file(s), the .log and the .cue file to the final directory.
 Projects


Wow, this paragraph is fastidious, my sister is analyzing these kinds
of things, so I am going to inform her.
my webpage … penampakan pocong